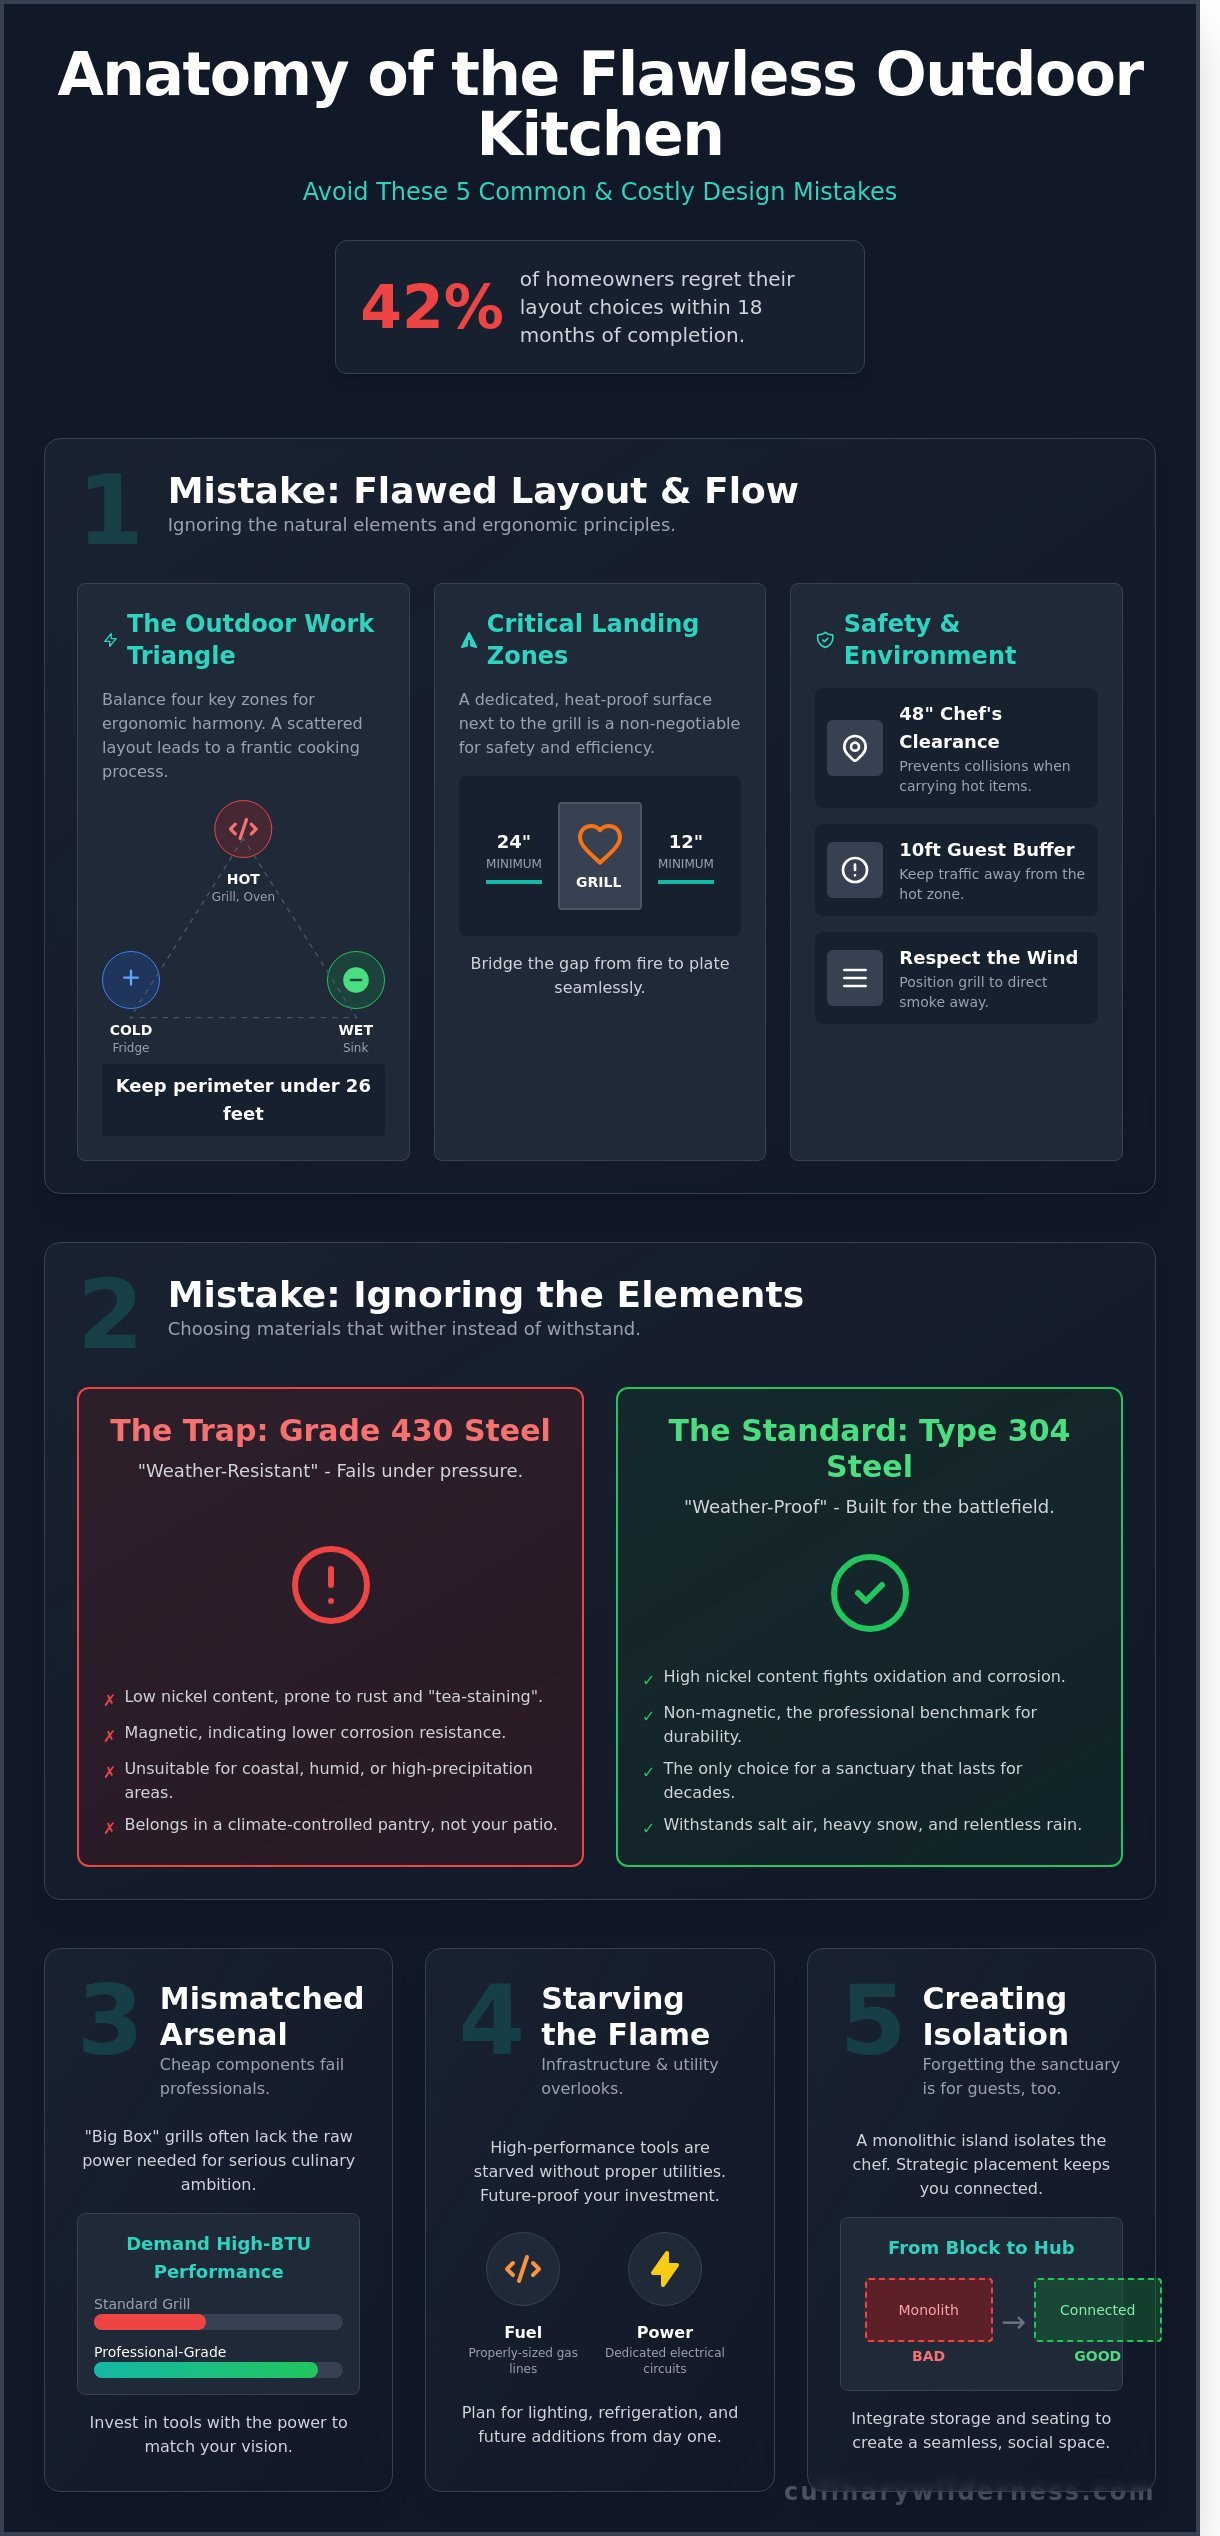
A stone hearth that cracks during its first winter freeze isn't just a repair bill; it's a fracture in your connection to the wild. In 2023, data from premium landscape architects showed that 42 percent of homeowners regretted their layout choices within 18 months of completion. These common outdoor kitchen design mistakes often stem from a desire for aesthetics that ignores the raw, unforgiving reality of the elements. You want a sanctuary where the scent of cedar smoke and the hiss of searing fat feel intentional, not a source of constant frustration.
You likely believe that a high-end grill and a slab of granite are enough to master the elements. While those tools matter, a true culinary wilderness requires a deeper understanding of wind patterns, utility flow, and material durability. This guide promises to help you avoid the costly pitfalls of poor planning, ensuring your investment stands for decades. You'll learn how to harmonize your infrastructure with nature and select appliances that thrive in the rain and frost. We will explore the critical intersections of ergonomics and environment to build a space that elevates every meal you prepare under the open sky.
Key Takeaways
- Master the "Outdoor Work Triangle" and essential landing zones to ensure your culinary flow remains uninterrupted by the vastness of the wild.
- Learn why Type 304 Stainless Steel is the only standard for a rugged sanctuary that must withstand the untamed elements year-round.
- Avoid common outdoor kitchen design mistakes like falling for "big box" traps, ensuring your grill and pizza oven possess the raw power to match your culinary ambition.
- Future-proof your sanctuary by mastering the infrastructure requirements that prevent starving your high-BTU professional tools of their necessary fuel and power.
- Discover how strategic storage and island placement transform a monolithic block into a seamless, organized space that keeps the chef connected to both the land and their guests.
The Map and the Compass: Navigating Layout and Flow
Building an outdoor kitchen is an act of reclaiming the elemental. It's a return to the fire. One of the most common outdoor kitchen design mistakes is forgetting that the wild is unpredictable. You aren't just placing cabinets; you're negotiating with the wind and the sun. If you ignore the prevailing breeze, your guests will be shrouded in acrid smoke rather than the intoxicating scent of searing fat. Respecting the history of barbecue means understanding that smoke is a tool for flavor, not an obstacle for the cook. Position your grill so the air carries the exhaust away from the seating area. Keep the heat of the fire at least 10 feet from the flow of guests. This creates a safe sanctuary where the conversation flows as freely as the wine.
Traffic patterns are the invisible rivers of your patio. When the grill is roaring at 500 degrees, you don't want a guest stumbling into the heat zone while looking for a cold drink. Designate a clear path for movement that bypasses the "hot zone" entirely. A well-planned layout ensures the chef has a 48-inch clearance for movement, preventing collisions when carrying heavy, scalding trays of meat. This isn't just about comfort; it's about the quiet confidence that comes from a space that works with you, not against you.
Mastering the Outdoor Work Triangle
The outdoor kitchen demands a different rhythm than its indoor counterpart. Distances feel longer under an open sky, and every extra step is a moment taken away from the craft. You must balance four distinct zones to find harmony:
- Cold Zone: The refrigerator or ice chest where ingredients wait in the chill.
- Hot Zone: The grill, pizza oven, or side burner where the transformation happens.
- Wet Zone: The sink for rinsing foraged greens or cleaning a blade.
- Dry Zone: The expansive counter space for prepping and staging.
The Work Triangle is the heartbeat of kitchen ergonomics, pulsing between the fire and the frost. While indoor triangles usually stay tight, an outdoor version can expand slightly. However, exceeding a 26-foot total perimeter for these three points leads to exhaustion. You want the cold beer and the raw steaks within a pivot's reach of the flame. When these zones are scattered, the cooking process feels fragmented and frantic.
The Landing Zone: A Sanctuary for the Plate
There is a specific kind of panic that sets in when you're holding a 15-pound cast-iron Dutch oven and have nowhere to set it down. Many homeowners realize too late that they've sacrificed utility for aesthetics. This is another of the common outdoor kitchen design mistakes that ruins the flow of a meal. You need a dedicated "landing zone" immediately adjacent to your cooking surfaces. It's the bridge between the raw heat of the fire and the communal joy of the table.
For a high-performance gas grill, you need at least 24 inches of clear counter space on one side and 12 inches on the other. This isn't a suggestion; it's a requirement for safety and efficiency. This space allows you to move finished proteins away from the direct heat while you prepare the next course. It also provides a staging area for your tools, keeping your tongs and thermometers off the floor and within the reach of your hand. Balance your prep space with these serving areas to ensure the transition from fire to plate is seamless and unhurried.
Ignoring the Elements: Materials That Wither in the Wild
The wild does not negotiate. Nature is a relentless force that slowly grinds down everything in its path. One of the most common outdoor kitchen design mistakes involves falling for the marketing trap of "weather-resistant" labels. Resistance is a polite suggestion that a material might survive a light drizzle or a hazy afternoon. True outdoor cooking requires materials that are weather-proof. This distinction is the difference between a kitchen that lasts 20 years and one that begins to rot after two seasons of heavy snow. When you build in the elements, you are building for a battlefield.
The Stainless Steel Standard
Grade 430 stainless steel belongs in a climate-controlled pantry, not on a windswept patio. It lacks the nickel content required to fight oxidation in the open air. In coastal zones where salt air carries a high moisture content, 430 grade will show tea-staining and rust spots within 180 days. For the rugged gourmet, Type 304 stainless steel is the only viable option. It contains 18% chromium and 8% nickel, creating a molecular shield against the elements. This alloy survives the bite of mountain frost and the humid weight of the tropics without flinching. If your cooking station sits under a roof or pavilion, installing high-performance exhaust hoods is a necessity. These units pull grease and concentrated heat away from your overhead structures, preventing the buildup of flammable residue on your timber beams or stone ceilings.
Countertops: From Earth to Embers
Indoor granite often relies on topical sealers and petroleum-based resins to maintain its shine. Under the relentless UV radiation of the high plains, these chemicals break down and yellow in less than 24 months. Porous stones like marble are even more vulnerable. Rainwater seeps into the microscopic fissures of the stone. When the temperature drops below 32 degrees, that trapped water expands by 9%, causing the stone to spiderweb and crack from the inside out. High-quality concrete and soapstone offer a more resilient path. Soapstone is chemically inert and non-porous; it scoffs at red wine spills and the thermal shock of a cast iron pan pulled straight from 800-degree embers. These materials embrace the patina of time rather than fighting it, growing more beautiful with every season of use.
Heat is a ghost that haunts poorly designed enclosures. Ignoring the ventilation gap is a dangerous oversight that ruins many builds. Without proper airflow, heat from high-BTU grills builds up inside the cabinetry. This trapped energy warps internal structures and can lead to catastrophic failure. When planning your outdoor kitchen, you must integrate venting panels every 4 to 6 feet of cabinetry. This allows the structure to breathe, ensuring the wood and stone stay dry and the gas lines remain safe. To find the right balance between raw nature and refined utility, consider our collection of elemental cooking tools designed for the open air.
Avoid the common outdoor kitchen design mistakes that treat the backyard like a second living room. The outdoors is a different realm entirely. It demands materials that are forged in fire and tested by ice. By choosing alloys and stones that respect the power of the sun and the reach of the frost, you ensure your kitchen remains a sanctuary for decades. Don't let your investment wither in the wild because of a label that promised more than it could deliver.
The Mismatched Arsenal: Why Cheap Components Fail the Professional
The allure of the big-box discount is a siren song for the unwary. Many homeowners believe a grill is simply a box that holds fire, but falling for the "Big Box" trap is one of the most common outdoor kitchen design mistakes. These entry-level units often utilize thin-gauge 430 stainless steel. In humid or coastal environments, this material succumbs to oxidation and structural fatigue within 24 months. A professional kitchen requires an elemental resilience that cheap components simply can't provide. When the heat rises to 800 degrees Fahrenheit, the metal must expand and contract without warping or losing its seal.
Appliance synergy is equally vital. If you integrate a high-performance pizza oven into your layout, its output must complement your primary grill. A mismatch in BTU (British Thermal Unit) capacity creates a disjointed cooking flow. A professional-grade grill pushing 25,000 BTUs per burner makes a weak, 10,000 BTU specialty oven feel like a toy. You want the heat to be consistent across your entire hearth so that your timing remains precise, whether you're searing a dry-aged ribeye or blistering a sourdough crust.
The refrigeration mistake is perhaps the most frequent point of failure. An indoor dorm fridge is designed to operate in a climate-controlled 72-degree room. On a 95-degree July afternoon, that compressor will run continuously until it burns out. True outdoor refrigeration is UL-rated to maintain food-safe temperatures even when the sun beats directly on the stainless steel casing. Similarly, don't overlook the side burner. It's the workspace for elemental sauces and tallow reductions. Without a dedicated high-heat burner, you're forced to retreat to the indoor kitchen, breaking the connection with the fire and the landscape.
Investing in the Long Game
Brands like Fire Magic and ZLINE represent the pinnacle of outdoor engineering because they're built for the decades, not the seasons. While a professional grill might require a $6,000 investment, its ROI is realized over a 12-year lifespan. Compare this to a $900 budget unit that requires replacement every three years; the "cheap" option actually costs 20 percent more over a decade. To protect this investment, high-quality storage drawers are essential. They seal out the damp earth and pests, keeping your forged steel tools dry and ready for the flame.
Specialty Cooking: Beyond the Burger
The Rugged Gourmet understands that flavor is a product of fuel. Avoiding common outdoor kitchen design mistakes means planning for a multi-fuel approach that includes gas, charcoal, and hardwood. Integrating a heavy-duty smoker or a wood-fired oven requires more than just counter space; it requires airflow management. Position your specialty ovens so the wood smoke drifts away from the dining area but remains close enough for the cook to monitor the sensory cues of the char. This balance ensures the hearth remains the heart of the experience without overcrowding the chef's workspace.
Starving the Flame: Infrastructure and Utility Overlooks
Steel and stone look eternal, but they're useless without fuel. One of the most common outdoor kitchen design mistakes happens underground, hidden beneath the pavers and soil. It starts with the gas line. If your pipe is too thin, your fire will be weak. A professional outdoor kitchen is a hungry beast. It demands a steady, high-pressure flow of energy to transform raw protein into a charred masterpiece. When you ignore the invisible veins of the kitchen, you're building a monument to frustration rather than a sanctuary for flavor.
The snap of a breaker or the hiss of a starved burner ruins the rhythm of a cook. These failures aren't just inconveniences; they're structural flaws that require expensive excavation to fix. Planning for 20 percent more capacity than you think you need is the only way to ensure your sanctuary remains functional as your skills and equipment evolve.
The Veins of the Kitchen: Gas and Electric
You need flow. A 1/2-inch gas line is a frequent bottleneck in poorly planned builds. At 20 feet, it might deliver enough fuel, but stretch that pipe to 50 feet and your high-end gas grills will struggle. They'll gasp for fuel when you crank the sear station. Calculate your total BTU load carefully. A professional 42-inch grill often pulls 100,000 BTUs alone. Add a 60,000 BTU power burner and you've already exceeded the capacity of standard residential lines. You likely need a 3/4-inch or 1-inch line to maintain peak intensity.
Electricity requires the same foresight. A refrigerator pulls a steady 15 amps, while a dedicated ice maker requires its own 15-amp circuit to prevent surges. If these share a line with your rotisserie motor and a high-speed blender, the circuit will fail. Run 20-amp dedicated GFI circuits for heavy appliances. Always pull an extra 1-inch PVC conduit through the stone island during construction. It's a cheap insurance policy for future tech or additional lighting you'll inevitably want later.
- Drainage: Avoid the "dry well" trap. A gravel-filled hole cannot handle grease or heavy rinsing. It will clog and smell within 12 months.
- Sewer Connection: If your sink sees heavy use, local codes in 85 percent of jurisdictions require a connection to the primary sanitary sewer.
- Utility Access: Install access panels every 6 feet. If a pipe leaks, you don't want to tear down a stone wall to find it.
Illuminating the Feast
Ambiance is for the guests; the chef needs clarity. Relying on soft, decorative lanterns is one of the common outdoor kitchen design mistakes that leads to overcooked steaks and sliced fingers. You need 500 to 800 lumens of focused task lighting directly over the prep zone and the grill surface. Use 3000K color temperature bulbs to ensure the meat looks natural under the light, allowing you to judge the sear by sight alone.
Positioning is everything. Don't place high-intensity lights directly above the chef's head, as this creates harsh shadows on the cutting board. Avoid placing blue-spectrum lights directly over the cooking surface in summer months. These wavelengths attract insects, turning your workspace into a battleground. Use fire tables for the seating area. They provide a low, flickering glow that grounds the space in an ancient, elemental warmth without competing with the precision of your task lights.
Ready to build a kitchen that never falters? Explore our professional-grade hardware to power your outdoor sanctuary.
Beyond the Grill: Creating a Seamless Outdoor Sanctuary
The most profound meals aren't just about the heat of the flame; they're about the flow of the evening. A frequent error in these spaces is the monolithic block. Homeowners often construct a massive, unyielding island that acts as a physical barrier between the heat of the fire and the laughter of the guests. This is one of the most common outdoor kitchen design mistakes, as it turns the chef into a lonely sentinel. To avoid this, designers recommend a minimum 12-inch counter overhang for bar stools. This small adjustment transforms a cold stone wall into a communal gathering point where the scent of charred oak and searing fat can be shared in real time.
The transition from the grates to the plate is equally critical. In the open air, a brisk 15-mile-per-hour wind can strip the heat from a medium-rare ribeye in seconds. Integrating a dedicated warming drawer or a stone staging area near the primary heat source ensures the feast remains at its peak. Precision matters here. A resting meat’s internal temperature should only drop by 5 degrees before it meets the knife. Without a plan for this transition, the wild environment begins to reclaim the meal before the first bite is even taken.
The Art of Outdoor Storage
Storage is the silent backbone of the wild kitchen. Without it, the rhythm of the meal breaks. High-quality storage doors and drawers are essential for protecting tools from the elements. A 304-grade stainless steel seal prevents moisture from rusting your carbon steel knives or dampening your wood chips. Use the three-second reach test; if you cannot put your hand on a seasoned cast iron skillet or a pinch of sea salt within three seconds, your layout is failing you. Organization must be intuitive. Furthermore, 40-gallon integrated trash and recycling bins are the most forgotten essentials. Neglecting these leads to unsightly piles of waste that invite pests like raccoons and ants into your sanctuary. A sealed, pull-out bin keeps the workspace clean and the focus on the food.
The Final Polish: Comfort and Connection
To truly master the elements, you must account for the changing seasons. A well-placed pergola or a set of 48,000 BTU infrared heaters can extend the cooking season by 60 days in northern climates. These structures provide a necessary boundary against the frost, allowing the smoke to rise even as the first snow falls. The fire table serves as the bridge in this environment. It is where the role of the chef ends and the role of the host begins. Moving from the intense, focused heat of the grill to the soft, ambient glow of a fire pit allows the conversation to deepen. This transition is another area where common outdoor kitchen design mistakes occur; people often forget that a kitchen is a workspace, but a sanctuary is a destination. By layering light, warmth, and texture, you create a space that feels less like an appliance showroom and more like a permanent camp. A well-designed kitchen returns the soul to the source by stripping away the noise of the modern world and leaving only the fire, the food, and the stars.
Forging Your Elemental Sanctuary
The transition from a simple patio to a professional culinary outpost requires a layout that respects the 3-foot safety clearance and a commitment to 304-grade stainless steel. You've learned how to navigate common outdoor kitchen design mistakes that lead to corroded burners or starved gas lines. True mastery lies in the details; it's the difference between a component that fails after 2 winters and a lifetime investment. We've curated a selection of rugged, professional-grade tools designed for those who seek a deeper connection to their food. As an authorized dealer for legacy brands like Fire Magic and ZLINE, we ensure your gear matches your ambition. We provide expert nationwide shipping across all 50 states to deliver the heart of your sanctuary directly to your edge of the wild.
Build your culinary outpost with the finest appliances from Culinary Wilderness
The embers are waiting. It's time to step outside and reclaim the fire. Your journey back to the source starts now.
Frequently Asked Questions
How far should an outdoor kitchen be from the house for safety?
Position your outdoor kitchen at least 10 feet from your home’s exterior walls. This distance protects your siding from the intense, elemental heat of the grill. The NFPA 1 fire code mandates this gap to prevent accidental structure fires. It’s a simple boundary that keeps your sanctuary safe while you master the flame. A 10-foot buffer also ensures smoke doesn't drift into your open windows during a feast.
What is the best countertop material for an outdoor kitchen in a cold climate?
Natural granite with a honed finish is the premier choice for environments where temperatures drop below 32 degrees. Its dense, crystalline structure resists the 10% expansion of freezing water that often shatters porous tiles. This stone is a piece of the earth, weathered and unyielding. It stays beautiful through the harshest winters without cracking or losing its rugged character. Avoid marble, as it’s too soft for the wild.
Do I need a permit to build an outdoor kitchen with a gas line?
You must obtain a permit from your local building department for any permanent gas line installation. In 95% of American jurisdictions, a licensed professional must verify the work to comply with the International Fuel Gas Code. This isn't just red tape; it’s a vital safety measure for your home. Skipping this step can lead to a $500 fine or significant insurance complications if a leak occurs later.
Can I use indoor appliances in my outdoor kitchen if they are covered?
Don't use indoor appliances outside because they aren't engineered for the raw intensity of the wild. Indoor units fail when ambient temperatures exceed 100 degrees or plummet below 40. Outdoor-rated models feature 304-grade stainless steel and sealed components to resist rust and humidity. Using the wrong gear is a recipe for mechanical failure within the first 12 months. Stick to appliances built to endure the sun and rain.
How much does a professional-grade outdoor kitchen typically cost?
A professional-grade outdoor kitchen typically costs between $15,000 and $35,000 for a complete, high-end setup. This investment covers the stone, the steel, and the fire. Avoiding common outdoor kitchen design mistakes, such as choosing cheap materials, ensures a 20% return on your home value. It’s the price of creating a permanent, sophisticated space for your culinary adventures. Quality gear lasts 15 years longer than budget alternatives.
What is the most common layout mistake for outdoor kitchens?
The most frequent error is failing to include a 24-inch landing zone on both sides of your grill. Without this space, your prep work becomes chaotic and your cooking rhythm is broken. A cramped workspace is one of the most common outdoor kitchen design mistakes that ruins the joy of open-fire cooking. You need room for the blade, the board, and the ingredients. Proper flow requires at least 6 feet of total counter length.
Do I really need an exhaust hood for my outdoor grill?
You need a professional exhaust hood if your grill is positioned under a porch or any combustible roof. Smoke is thick and elemental; it will stain your cedar or stone without a 1,200 CFM blower. Ensure the hood extends 3 inches beyond the grill width on each side to catch every wisp of vapor. It’s essential for air quality and fire safety. Without it, grease buildup creates a 30% higher fire risk.
How do I winterize my outdoor kitchen appliances properly?
Shut off the water supply and drain all lines before the first frost arrives in October or November. Use compressed air to blow out the pipes so a 10% expansion of ice doesn't burst your plumbing. Clean the grates and apply a thin layer of mineral oil to protect the steel. This ritual preserves your gear through the long, quiet winter. Covering units with breathable vinyl prevents moisture from trapping rust against the metal.


