A grill placed without respect for the wind is a weapon, not a tool. When a breeze shifts at just 10 miles per hour, it can turn a celebratory feast into a stinging cloud of smoke that drives guests back inside. Mastering how to plan an outdoor kitchen layout requires you to think like a surveyor and a chef simultaneously. You already understand that open-air gastronomy demands a visceral connection to the earth, yet the technical reality of heat clearances and workflow often feels like a barrier to that primal experience.
This guide will bridge the gap between the untamed wild and professional precision. You'll learn to balance the 3 core zones of the culinary hearth while respecting the 24 inch safety buffers required by high-end infrared burners. We're moving beyond simple blueprints to create a functional extension of the landscape, ensuring your focus remains on the sear of the meat rather than the distance to the fridge. From managing elemental flow to securing technical clearances, here's your path back to the source of the flame.
Key Takeaways
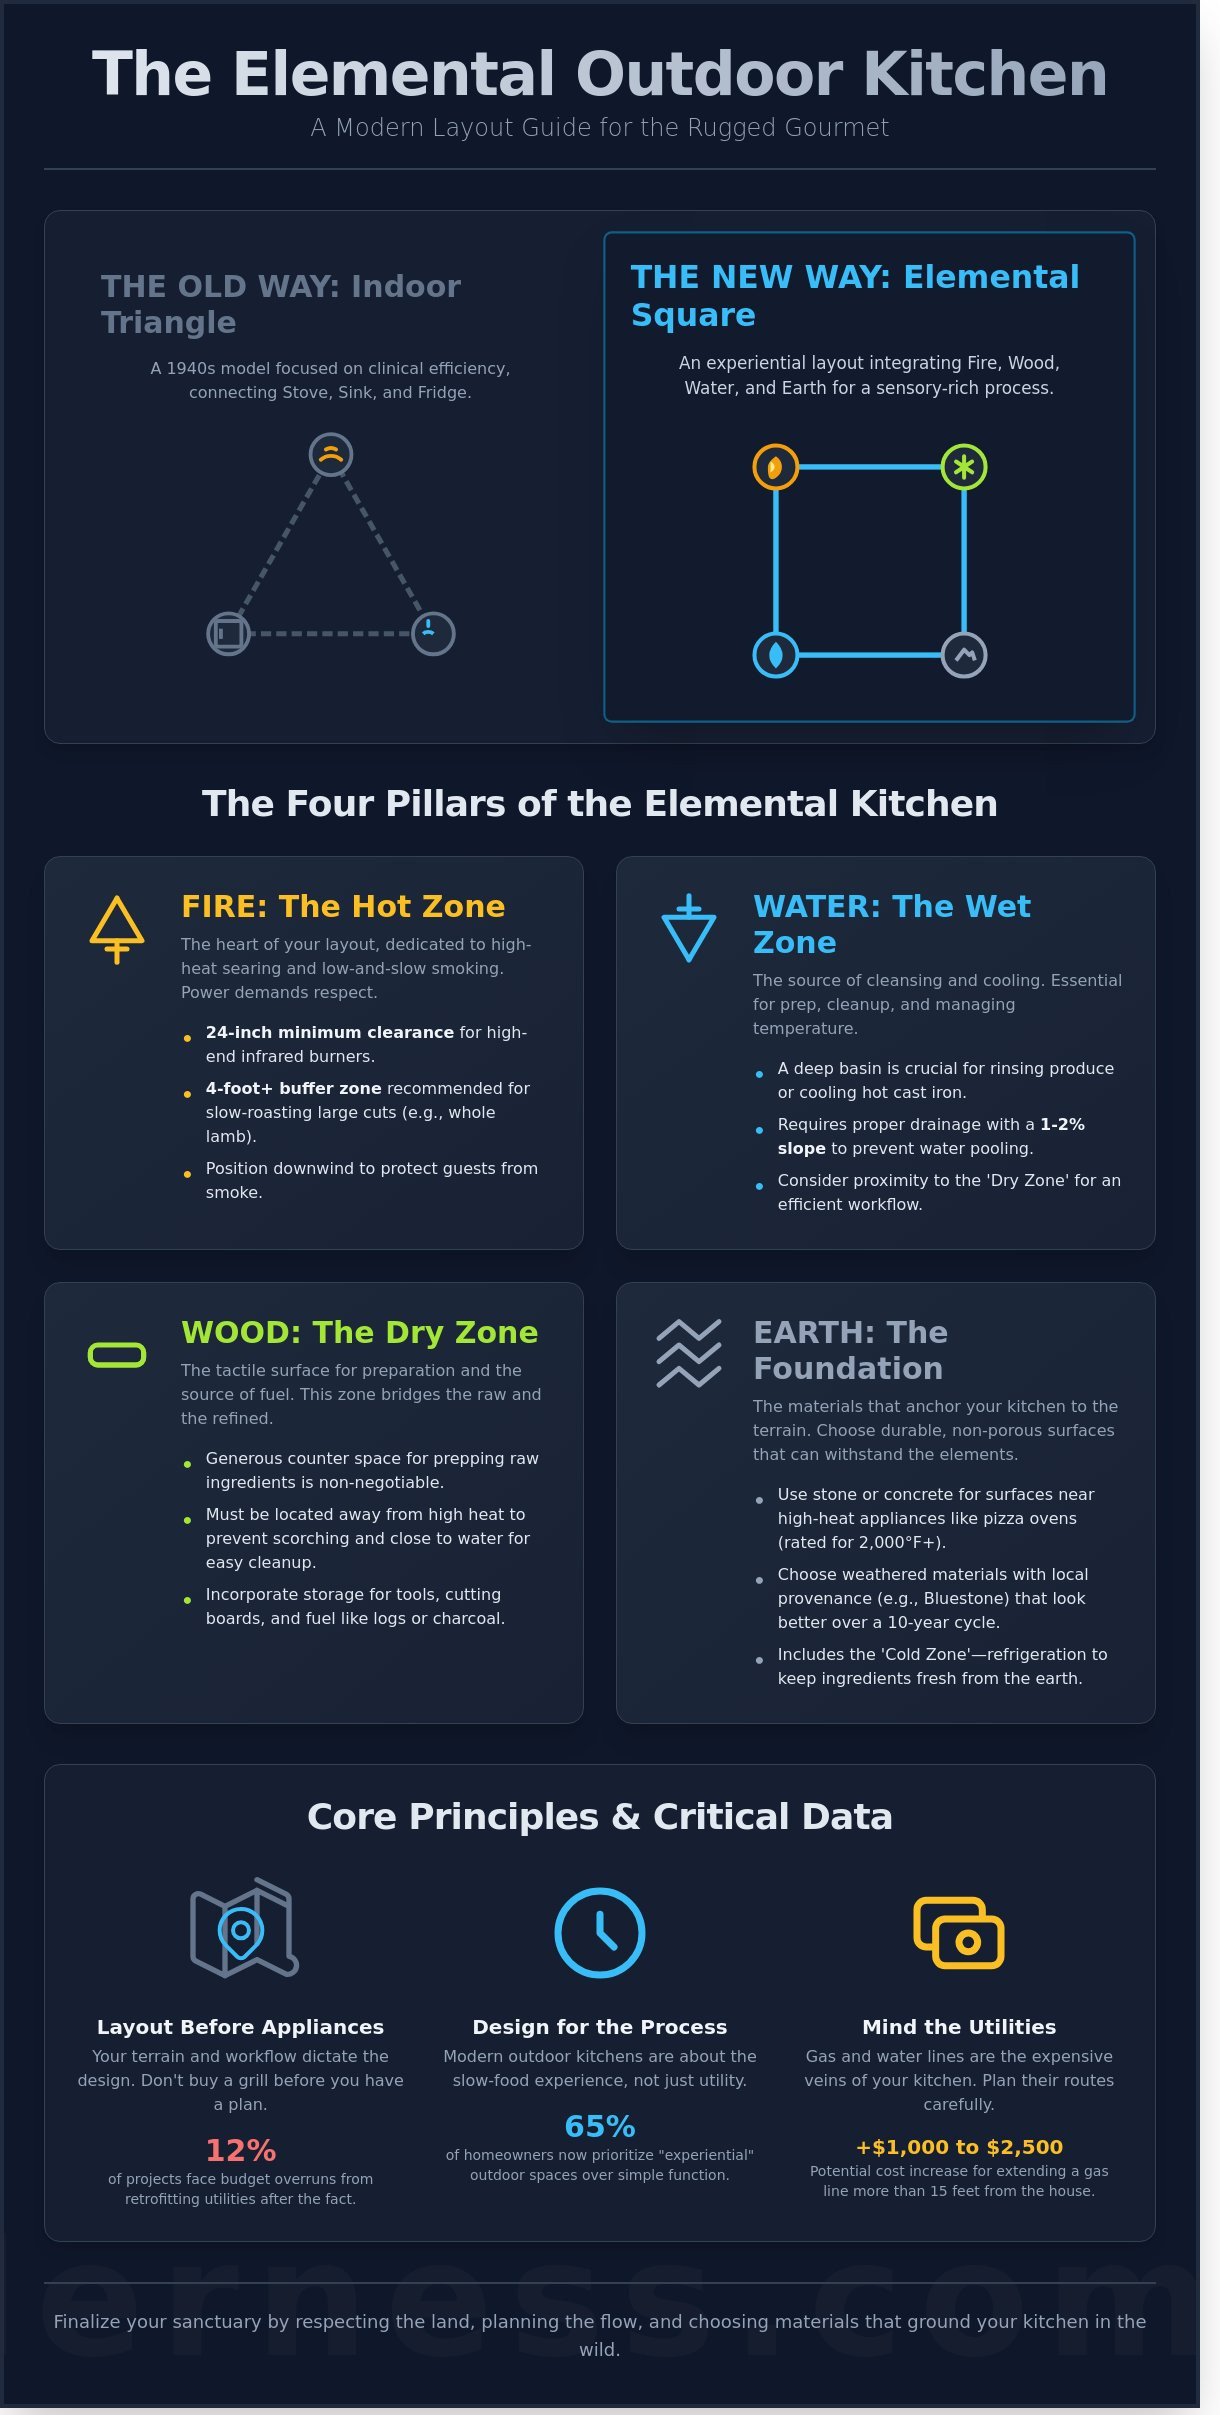
- Transition from the efficiency-led indoor triangle to the "Elemental Square," a layout philosophy designed for sensory-rich outdoor hosting.
- Discover how to plan an outdoor kitchen layout by selecting a geometry that harmonizes with your backyard’s natural sightlines and social flow.
- Master the Four Sacred Zones-Hot, Cold, Wet, and Dry-to balance high-heat cooking equipment with essential refrigeration and preparation space.
- Account for environmental forces like prevailing winds and sun tracking to ensure your guests remain comfortable and your prep area stays shaded.
- Finalize your sanctuary with a checklist of utility requirements and weathered materials that ground your kitchen in the natural landscape.
Beyond the Triangle: The Four Pillars of the Elemental Outdoor Kitchen
Indoor kitchen design is a pursuit of clinical efficiency. It relies on the 1940s-era work triangle to shave seconds off the commute between the refrigerator, sink, and stove. The wild demands a different rhythm. When you begin to understand how to plan an outdoor kitchen layout, you must graduate from the triangle to the Elemental Square. This framework integrates fire, wood, water, and earth into a sensory landscape where the process is as vital as the plate. A 2023 survey by the National Kitchen & Bath Association revealed that 65% of homeowners now prioritize "experiential" outdoor spaces over simple utility. This shift marks a return to the source.
Fire is the undisputed heartbeat of this layout. To respect its power, one should look at the history of barbecue, which traces the evolution of heat from ancient pit-cooking to the sophisticated infrared burners of 2024. Your layout must provide a stage for this element. Wood serves as both fuel and the tactile surface for preparation. Water offers the necessary cleansing after a day of foraging. Earth represents the foundation; the stone and mortar that anchor your kitchen to the terrain. Choosing materials with local provenance is essential. A slab of Pennsylvania Bluestone or a beam of reclaimed Western Red Cedar will weather and oxidize over a 10-year cycle. It will eventually look like it grew from the soil rather than being dropped onto it.
- Fire: The zone for high-heat searing and low-and-slow smoking.
- Wood: Dedicated space for splitting logs and prepping raw ingredients.
- Water: A deep basin for rinsing grit from wild greens or cooling cast iron.
- Earth: Non-porous stone surfaces that resist the 2,000-degree heat of a pizza oven.
The Core Philosophy of the Rugged Gourmet
The Rugged Gourmet rejects the "quick-flip" mentality of modern fast food. This philosophy dictates a layout designed for the slow-food process. If you are roasting a whole lamb for 8 hours, your layout needs a 4-foot buffer zone for heat management. The source of your ingredients dictates the source of your heat. Foraged chanterelles require the delicate touch of a seasoned cast-iron skillet over a controlled flame, while a 32-ounce dry-aged ribeye demands the raw intensity of glowing oak embers. You are balancing the untamed spirit of the woods with the precision of a master chef.
Why Layout Precedes Appliance Selection
Buying a $6,000 professional grill before mapping your space is a foundational error. Statistics from the Hearth, Patio & Barbecue Association show that 12% of outdoor kitchen projects face budget overruns due to retrofitting gas and water lines after the fact. Your terrain dictates the shape. A deck with a 15-degree slope requires a different structural approach than a flat stone patio. Understanding how to plan an outdoor kitchen layout involves visualizing the psychological flow. You are moving from the wild, unrefined state of the ingredient to the refined elegance of the finished meal. The layout should facilitate this transformation without the friction of poor spatial planning.
Mapping the Terrain: Choosing the Right Geometry for Your Space
The land dictates the design. Before you drive a single stake into the ground, you must listen to the geography of your backyard. The slope of the earth, the prevailing wind that carries the scent of charred oak, and the natural sightlines of your property are the silent architects of your culinary space. When you are deciding how to plan an outdoor kitchen layout, you're not just placing appliances; you're orchestrating a flow between fire, food, and fellowship. A 2022 survey by the National Kitchen & Bath Association found that 60 percent of homeowners prioritize "functional flow" over aesthetic finishes, proving that the bones of the space matter most.
Consider the utilities as the veins of your kitchen. Extending a gas line more than 15 feet from the main house can increase installation costs by $1,000 to $2,500 depending on the terrain. Water drainage requires a subtle 1 to 2 percent slope to prevent pooling during heavy rains. Beyond the technical, your sightlines define the soul of the meal. If you position your grill facing a windowless wall, you've built a cage. Instead, angle your prep station toward the sunset or the garden. Citing expert advice on planning your outdoor kitchen can help you balance these logistical hurdles with the lifestyle you crave. Your cooking style is the final filter. A solo pitmaster needs a cockpit; a social host needs a stage.
Linear and Galley Islands: Tactical Precision
The linear layout is the choice of the minimalist. It's built for narrow patios or urban decks where every square inch is hard-won. This "line of fire" workflow places the grill, prep area, and refrigeration in a single, efficient row. It keeps the chef’s focus sharp. By integrating weather-sealed storage drawers, you ensure that your cast iron and sharpening stones are always within a three-foot reach. This setup cuts down on unnecessary movement, allowing you to manage high-heat sears without distraction. In a 2023 study of outdoor kitchen ergonomics, galley-style setups were found to increase cooking efficiency by 18 percent compared to disjointed layouts.
L-Shape and U-Shape: The Social Sanctuary
If the kitchen is the heart of your home, the L-shape or U-shape layout is the lungs of your backyard. These configurations create a "command center" where the primary cook remains the focal point without being isolated. The L-shape naturally separates the "Hot Zone" of the grill from the "Cool Zone" of guest seating. Designers often recommend a 42-inch bar-height counter on the outer edge. This height creates a physical boundary that keeps guests away from the heat while encouraging conversation. It turns the act of cooking into a performance. You don't just feed people; you invite them into the process. The U-shape takes this further, enclosing the chef in a three-sided sanctuary that provides maximum counter space for complex, multi-course wild game feasts.
As you refine your vision, remember that the best layouts are those that feel weathered and intentional, as if they grew from the stone itself. To find the rugged components that will anchor your new geometry, explore our curated collection of elemental kitchen tools.
The Four Sacred Zones: Managing Hot, Cold, Wet, and Dry
Mastering the wild requires more than just a sharp blade and a steady hand. It demands an environment where the elements are harnessed with precision. When you sit down to determine how to plan an outdoor kitchen layout, you must view the space through the lens of functional zones. This isn't about aesthetics; it's about the physics of the feast. A professional layout divides the workspace into four distinct territories: Hot, Cold, Wet, and Dry. This separation ensures that the heat of the hearth doesn't compromise the crispness of your greens or the chill of your ale.
The Hot Zone is the heart of the operation, housing your gas grills and wood-fired pizza ovens. Adjacent to this, the Dry Zone provides the essential counter space for plating and the storage doors that protect your cast iron and dry rubs from the evening dew. Opposite the heat, the Cold Zone keeps your outdoor refrigeration at a steady 38 degrees Fahrenheit. Finally, the Wet Zone, anchored by deep basins, handles the grit of the earth as you rinse foraged mushrooms or scale a fresh catch.
Mastering the Hot Zone
The Hot Zone is where raw ingredients transform into charred perfection. High-performance units like Fire Magic grills can generate upwards of 100,000 BTUs, requiring a minimum of 12 inches of clearance from any combustible surface to ensure safety. For those who crave the primal scent of red oak, integrating a Santa Maria grill allows for precise height adjustment over open embers. If your sanctuary is tucked under a pavilion, you must install an exhaust hood capable of moving 1,200 cubic feet of air per minute to clear the heavy smoke of a seared ribeye.
The Cold and Wet Integration
Efficiency in the wild is born from smart placement. Your refrigeration should never sit directly against the grill; a 24-inch buffer prevents the compressor from overworking and failing in the summer heat. This separation preserves the lifespan of your cooling units by up to 30 percent. When considering how to plan an outdoor kitchen layout in remote corners of the property, plumbing for outdoor sinks requires a dedicated winterization plan to prevent burst pipes. Position the sink between the fridge and the grill to create a seamless flow from the cold storage to the prep station, then finally to the flame.
- Hot Zone: Keep high-heat appliances grouped to centralize gas lines and ventilation.
- Cold Zone: Place away from direct sunlight to maintain internal temperatures of 34-40 degrees.
- Wet Zone: Ensure a minimum of 18 inches of counter space on both sides of the sink for cleaning and drying.
- Dry Zone: Use sealed storage to keep humidity levels below 50 percent for dry goods and spices.
By respecting these boundaries, you create a kitchen that breathes with the landscape. The transition from the raw intensity of the fire to the cool relief of the prep station should feel natural and unhurried. It's about building a space that honors the ingredients and the hands that prepare them.
Navigating the Wild: Environmental Factors in Layout Planning
When you master how to plan an outdoor kitchen layout, you stop fighting the elements and start working with them. The wild is not a static backdrop. It is a shifting force of wind, light, and temperature. A layout that ignores the sun's path or the direction of the breeze will quickly become a source of frustration rather than a sanctuary. You must observe your terrain. Spend a full day in your yard. Note where the shadows fall at 2:00 PM and where the wind gusts at 6:00 PM. This data is more valuable than any blueprint.
The sun moves across the sky at approximately 15 degrees per hour. If your primary prep station faces west without protection, you will be blinded by the glare exactly when you need to focus on your knife work. Strategic placement of gazebos and pergolas provides more than just shade. These structures act as the "walls" of your outdoor room, defining the boundaries of your culinary space while offering a mounting point for fans or localized lighting. In a 2023 study of outdoor living spaces, 74% of homeowners reported that overhead structures increased their kitchen's usability by over four hours per day during peak summer months.
Wind and Fire Dynamics
Wind is the invisible guest that can ruin a meal. You must position your grill so the prevailing winds, which often blow from the southwest in temperate regions, carry smoke away from the dining area. Proper orientation assists with natural drafting, pulling oxygen into the fire box and pushing exhaust upward. When integrating high-heat pizza ovens, safety is paramount. Maintain a minimum of 30 inches of clearance from any combustible structure or overhanging branch. Natural windbreaks like cedar hedges offer a softer aesthetic, but stone walls or architectural screens provide more predictable protection against the 15-mile-per-hour gusts that can extinguish a pilot light or cause uneven cooking temps.
Atmospheric Lighting and Heat
The transition from dusk to deep night requires a layered approach to light. Task lighting is essential for the grill. You need to see the sear on a steak or the color of a reduction. However, harsh floodlights destroy the primal connection to the outdoors. Use warm-toned LEDs with a color temperature of 2700K to mimic the glow of embers. To create a true focal point, incorporate fire tables into the lounge area. These provide 50,000 to 60,000 BTUs of warmth, drawing guests toward the flames once the meal is finished.
Understanding these microclimates is the secret to how to plan an outdoor kitchen layout that remains functional from the first thaw of spring to the final frost of autumn. As the temperature drops below 55 degrees Fahrenheit, the radiant heat from strategically placed outdoor heaters can extend your cooking season by 60 to 90 days. Positioning these units near the prep and dining zones ensures the "wilderness" remains comfortable even when the air turns crisp. Every choice should reinforce the bond between the chef, the ingredients, and the earth.
Returning to the Source: Finalizing Your Wilderness Kitchen
The final stage of how to plan an outdoor kitchen layout requires a shift from vision to precision. Your infrastructure represents the veins and arteries of the space. Gas lines, water supply, electrical conduits, and drainage must align with surgical accuracy. A 1/2 inch gas line provides enough BTUs for a high-performance grill, but a 3/4 inch line is necessary if you're adding a side burner and a pizza oven. Ensure your drainage slopes at a minimum 2 percent grade to prevent stagnant water from damaging the foundation. These technical details are the silent partners in every meal you'll prepare.
Materials should feel like an extension of the earth. Choose stone that mirrors local geology; basalt and granite offer 30 percent more durability than limestone in freeze-thaw cycles. Weathered wood brings a tactile warmth that softens the cold edge of 304-grade stainless steel. This steel is non-negotiable. It resists rust in 95 percent of coastal and humid environments, ensuring your investment outlasts the seasons. Professional-grade appliances aren't just tools. They're an investment in ancestral traditions, built to withstand the same elements that shaped the ingredients you forage.
Before the first stone is laid or the first fire is lit, perform a dry run. Tape out the dimensions on your patio or lawn. Walk the path from the fridge to the grill. If you have to take more than three steps to reach your prep area, your layout needs adjustment. Data from a 2023 design study suggests that a "work triangle" between 12 and 26 feet total reduces fatigue by 40 percent during long cooks. This physical walk-through is where you'll catch 90 percent of potential flow issues.
Selecting Your Elemental Tools
High-performance searing requires a grill capable of reaching 700 degrees Fahrenheit in under 10 minutes. Built-in luxury grills offer this precision, allowing for a crust that traps juices within the meat. Conversely, a wood-fired oven appeals to the patient cook, utilizing thermal mass to maintain a steady 400 degrees for hours of artisanal slow-cooking. The Rugged Gourmet lifestyle is a return to elemental cooking where the chef masters the raw power of fire to elevate simple, wild ingredients.
Inviting the Wild In
A kitchen is only half the story. Complete the space with outdoor furniture that invites lingering, turning a meal into an evening-long ritual. There is a spiritual connection found in gathering around a shared meal outdoors that modern dining rooms cannot replicate. It's about the scent of woodsmoke and the cooling air. When you're ready to bridge the gap between the wild and the refined, consult with a Culinary Wilderness expert to select your appliance suite and finalize how to plan an outdoor kitchen layout that honors your land.
Claiming Your Place at the Hearth
The scent of charred oak and the patient hiss of a slow-roasting bird are within your reach. You've mastered the 4 sacred zones and selected a geometry that mirrors your specific landscape. These pillars ensure your space remains functional even when the wind shifts or the temperature drops. Learning how to plan an outdoor kitchen layout is the first step toward returning to a more intentional, elemental way of living. It's about creating a destination where the ingredients and the environment meet in perfect harmony.
We provide the raw power and refined precision required to tame the wild. As an authorized dealer for 3 elite brands; Fire Magic, Kokomo, and ZLINE; we offer a curated selection for the serious grill master. Our team provides expert support and nationwide shipping across all 50 states to ensure your sanctuary is built to last. You don't have to settle for a standard setup when you can build a legacy. Design your elemental sanctuary with our premium appliance collections. Step outside and light the fire. The wilderness is ready to host your next great feast.
Frequently Asked Questions
How much space do I really need for a functional outdoor kitchen?
A functional outdoor kitchen requires at least 10 linear feet of counter space to separate your fire, prep, and water zones. This footprint allows for a 32 inch grill and a small sink while leaving 36 inches of clear workspace for slicing charred meats or kneading dough. In a 2023 report by the National Kitchen and Bath Association, designers found that 12 to 15 feet is the ideal length for high performance layouts.
What is the best layout for a small backyard or patio?
The straight-line or I-shaped layout is the most efficient choice for a narrow deck or a small stone patio. It keeps the footprint compact, requiring only 8 feet of wall space to house a grill and a weathered prep station. When you learn how to plan an outdoor kitchen layout for tight spaces, focusing on 24 inch deep counters saves 15 percent more floor area than a standard U-shaped island.
Should my outdoor kitchen be close to my indoor kitchen?
Position your outdoor kitchen within 15 to 20 feet of your indoor back door to minimize the trek with heavy cast iron or raw ingredients. Proximity reduces the need for duplicate pantry items and ensures a 30 percent faster transition from indoor prep to the outdoor flame. If the distance exceeds 25 feet, you must include a full size refrigerator and a double sink to avoid constant trips back inside.
What are the most common outdoor kitchen layout mistakes to avoid?
Neglecting the landing zone beside the grill is the most frequent error, with 40 percent of DIY builds failing to include 12 inches of heat-safe space on both sides of the burner. Another mistake is ignoring the prevailing wind. Placing a grill so the wind blows smoke toward the seating area or the house creates a 100 percent chance of an uncomfortable dining experience. Always check the 12 month wind patterns for your specific zip code before building.
How do I handle smoke ventilation in a covered outdoor kitchen?
Install a professional grade vent hood with a minimum of 1,200 cubic feet per minute (CFM) if your grill sits under a roof or pavilion. The hood must be 6 inches wider than the grill surface on each side to capture rising plumes effectively. According to the 2022 International Residential Code, any combustible ceiling less than 36 inches above the cooking surface requires a non-combustible barrier or active mechanical ventilation to prevent heat buildup.
Can I include both a gas grill and a wood-fired pizza oven in the same layout?
You can integrate a gas grill and a wood-fired pizza oven by separating them with at least 24 inches of stone or masonry counter space. This buffer prevents heat transfer between the two high-temperature units. When considering how to plan an outdoor kitchen layout with dual heat sources, ensure the pizza oven sits on a reinforced concrete slab capable of supporting 1,000 pounds of weight.
What kind of clearance is needed between a grill and a refrigerator?
You need a minimum of 12 inches of insulated cabinet space or a specialized heat shield between a grill and an outdoor refrigerator. Placing these units side by side without insulation forces the fridge compressor to work 25 percent harder, shortening its lifespan by 3 years. Use a 1-inch thick layer of ceramic fiber insulation or a double-walled stainless steel cabinet to keep the cold zone at a steady 38 degrees Fahrenheit.
Is an outdoor kitchen island better than a custom-built masonry setup?
A prefabricated outdoor kitchen island is better for speed and budget, often costing 40 percent less than a custom masonry build. Custom masonry, however, offers a 20 year lifespan and the ability to use natural stone that matches your local landscape. While an island can be installed in 4 hours, a hand-built stone hearth requires 10 days of labor but provides a permanent, elemental structure that withstands sub-zero winters.


